Camtasia

Camtasia

Camtasia logo

Make and edit audio or video with this versatile multimedia tool.

Camtasia is a powerful video and audio recording tool available at no cost for UBC faculty, staff, and students. Camtasia allows for recording of your screen and/or your webcam, and has intuitive editing capabilities.

What is this tool for? | How do I get started? | Example Use Cases | Additional Resources | Similar Tools | Support Available


What is this tool for?

Camtasia can be used for one-take recordings or editing videos. You can record narration as you capture your screen, or separately. You can also mash-up and remix other footage together. Once you are done editing your video, you can upload it to Kaltura to make it available to your students. Make your media better produced using a versatile DIY media tool like Camtasia.

Highlights

  • PowerPoint slides can be integrated into Camtasia.
  • Recording can be paused at any time, or you can edit multiple takes together.
  • Using the Camtasia Editor, you can use overlays, cursors, and text to draw attention to specific areas.

How do I get started?

See Camtasia's system requirements.
If you wish to do video & audio recording, you will require a webcam and microphone.

  1. Log in to Canvas with your CWL.
  2. Click the Help menu on the left side of the page.
  3. Click the Software Distribution option.
  4. Select Camtasia from the menu.
  5. Choose your platform (Mac or Windows).
  6. Click the Add to cart button.
  7. Click the Proceed to Checkout button.
  8. Fill in your Contact Information.
  9. On the following page, note down the License Key because you will need it to complete the installation.
  10. Click the Proceed with Download button.
  11. Click the Download button and follow the instruction prompts to complete installation.

Example Use Cases

  • Video Testimonial – Camtasia Overview (3:29)
  • The Master’s degree program on Teaching French as a Second Language was developed in 2010. It is one of the first blended Master’s degree programs in the Faculty of Education. The students were distributed across Canada and the content was delivered in variety of ways. Instructors recorded some of their lectures using Camtasia.
  • Most of the videos in the Faculty of Education’s first Massive Open Online Course (MOOC) on Reconciliation through Indigenous Education were created by the media production team. However, Camtasia was also used for recording weekly “Concluding Thoughts” by the instructor.

Additional Resources

Similar Tools

Support Available

Support for this tool is provided by Learning Design & Digital Innovation (LDDI) and UBC Studios.

UBC Studios
Book a meeting with UBC Studios for a training workshop or a customized sessions for your specific needs: ubc.studios@ubc.ca

Library Online Course Reserves

Canvas logo

Anything in the UBC Library collection can supplement your course.

Located within Canvas, the Library Online Course Reserves (LOCR) tool allows you to search for books, articles, and multimedia and provide direct access for students. Items outside the UBC Library collection can be requested for copyright clearance at no cost to you or your students.

What is this tool for? | How do I get started? | Example Use Cases | Additional Resources | Support Available


What is this tool for?

LOCR is used to give students access to anything from the UBC library collection. You can add items such as journal articles, books and media immediately (if part of the collection) into your course. Giving students access to material using LOCR will ensure proper copyright clearance.

Highlights

  • You can reactivate previous readings of a course for future offerings of the course.
  • The Syllabus Service provides instructors a full-service option to provide learning content to students by uploading their syllabus.
  • Item views can be tracked, including who has viewed an item.

How do I get started?

You will require a credit course to use LOCR. You can login to LOCR using your CWL.

  1. Log into LOCR with your CWL
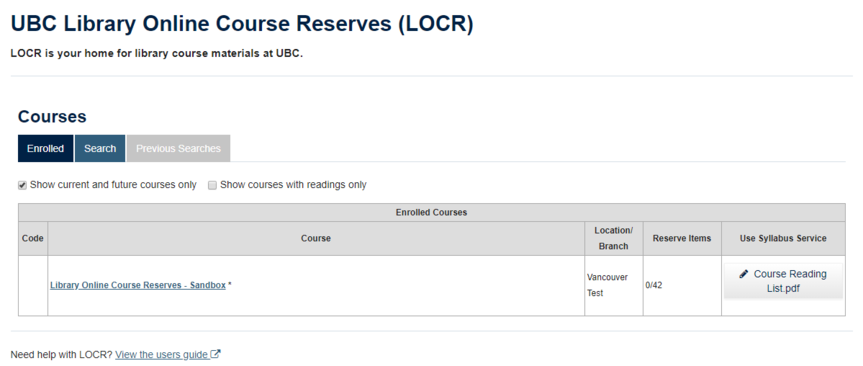
  2. The upload button is located next to your course and below the Use Syllabus Service header
  3. A screenshot of the LOCR interface with the

  4. Upload a copy of your syllabus readings as a Word or PDF document

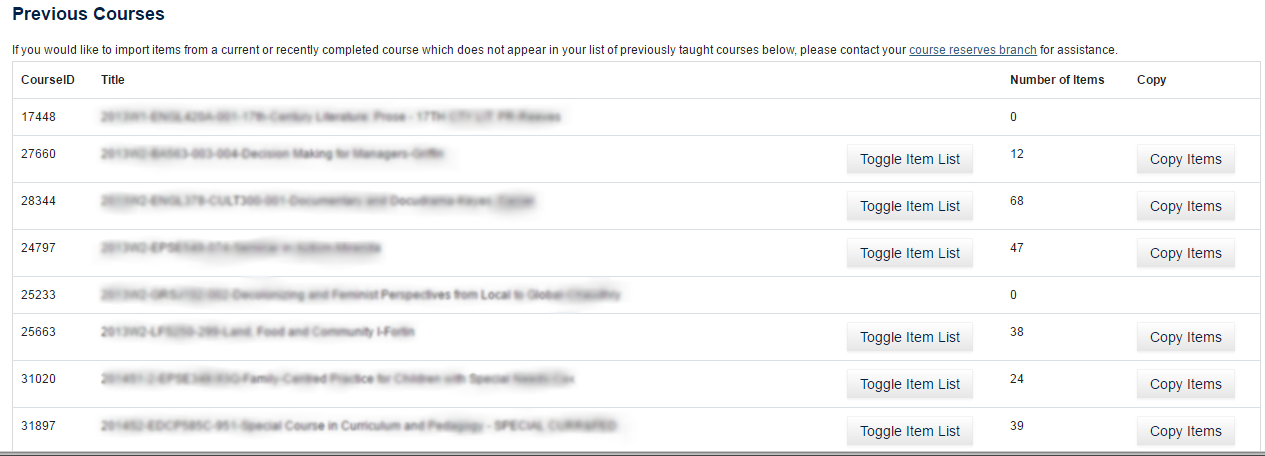
If you have used electronic course reserves for another course, you can quickly import all your readings into a new course section. Go to your target course and go to the Add Reserve Items tab. Your previous and current courses will be listed at the bottom of the page. You can copy the entire list of course readings or select individual items to import. Please note that physical items such as books and PDFs requiring copyright clearance will need to be reprocessed.
A screenshot of LOCR's course user interface. Copy items into a new course by clicking the Copy Items button next to a course.

Example Use Cases

  • Video Testimonial – LOCR Overview (2:21)
  • Additional Resources

    Support Available

    The Education Library provides support for LOCR, please contact them at education.reserve@ubc.ca
    Educational Technology Support does not provide support for LOCR.

    UBC Blogs

    WordPress logo

    WordPress is the publishing platform behind UBC Blogs.

    While most commonly used for blogs, it can also serve as a public or private site for course content. WordPress can be integrated into Canvas or used on its own.

    What is this tool for? | How do I get started? | Example Use Cases | Additional Resources | Similar Tools | Support Available


    What is this tool for?

    UBC Blogs can be used to build a course website, allow group authoring on a blog, provide peer review of authored content (editing with comments), provide class webspace development (adding annotated links/building a shared resource for a class), and provide a personal portfolio for students, faculty and staff (upload media – slides, video, images of your artwork).

    Highlights

    • Content from CLAS, UBC Wiki or YouTube can be embedded in your blog
    • UBC Blogs has a Canvas integration, allowing you to populate all your students into a shared blog.
    • UBC Alumni are also able to use UBC Blogs.

    How do I get started?

    To get started on UBC Blogs you will need a valid CWL account, if you have this go to the sign-up page which will redirect you to CWL authentication. Once authorized you will be directed to the blogs sign up page. Enter a username and e-mail address. From here you can either choose to be a UBC Blog account holder or choose to create a blog.

    1. Log in to your Canvas course.
    2. Go to Settings.
    3. Select the Navigation tab
    4. Scroll down until you find UBC Blogs.
    5. Click the gear and select Enable.

    To add additional users to your blog go to your left side panel under Users->Add Users.

    You can add a list of emails (one per line). If the email is in the system they will be added to the blog and the user will be sent an invite notice. If the user is not in the system then they must sign up to UBC Blogs before they can be added. After the user confirms they have signed up for UBC Blogs a user invite can be sent.

    Please note that CWL numbers can not be used to invite users anymore, only valid UBC Blog emails.

    Example Use Cases

    Additional Resources

    Similar Tools

    Support Available

    Support for this tool is provided by Educational Technology Support and UBC Blogs Support

    UBC Blog Support

    Weekly WordPress Clinic

    Choosing Learning Technologies: Student Privacy + FIPPA

    What is FIPPA?

    An important consideration in the selection of Learning Technologies is student privacy, including the storage, access, and sharing of personal student information between systems.

    In British Columbia, FIPPA, the Freedom of Information and Protection of Privacy Act, ensures through legislation that public bodies develop a privacy management program. Student private information must be protected, meaning stored for valid reasons and not shared without consent. Bill 22 – 2021, passed on November 25, 2021, brings significant amendments to FIPPA, including the possibility of storing personal information outside of Canada. This expands the possibility to leverage a broader set of tools and technology, however, at UBC all tools must go through a Privacy Impact Assessment (PIA), a risk management and compliance review process used to identify and address potential information privacy and security issues.

    UBC requires that all information about our students is gathered only through technologies that are part of our learning technology ecosystem, meaning technologies that have been officially approved after a Privacy Impact Assessment (PIA). If the use of another tool is required for a course, consent cannot be assumed by virtue of the student registering for the course.

    What is personal information?

    UBC defines personal information as “recorded information about an identifiable individual other than business contact information”. Even a student’s name and the fact that they are a UBC student is considered personal information. Learn more in the What is Personal Information Privacy Fact Sheet.

    How does this affect my teaching?

    All learning technologies supported by and implemented at UBC (e.g., Canvas, CLAS, Kaltura, etc.) have been officially approved after a Privacy Impact Assessment (PIA) and identified as FIPPA compliant. 

    Many collaborative tools used in workplaces outside of UBC present potential information privacy and security issues, including Google Docs, Dropbox, Slack, Skype, and other tools.

    Students should not be required to share their personal information with these services as part of any course (including setting up an account), however, if these tools support your pedagogical and instructional goals and help your students to build key skills and literacies, the following practices are recommended for their use.

    1. Be transparent with your students on why you’re asking them to use these tools.
    2. Provide a boiler-plate notice on what the tool is and how it stores their data (sample provided below):
      Data used for TOOL NAME may not be protected, as this tool has not gone through a Privacy Impact Assessment (PIA) and identified as FIPPA compliant. When you access the tool/site, you will be required to create an account. While TOOL NAME may have a privacy policy TOOL PRIVACY POLICY LINK, UBC cannot guarantee security of your private details on servers outside of Canada. Please exercise caution whenever providing personal information. You may wish to use a pseudonym to protect your privacy if you have concerns. Please feel free to contact UBC (access.and.privacy@ubc.ca) or TOOL NAME support team if you have any questions.
    3. According to CTLT (UBC’s Centre for Teaching, Learning, and Technology), one recommended approach to complying with FIPPA and encouraging student use of such tools is to suggest their use of a pseudonym or alias, a false name that a student can use to set up an account.
      • Cloud-based tools may be used under the following conditions:
        1. Inform students that one of the resources they will be using is located on cloud-based servers (ideally, in the course syllabus) and during the registration process (so students can take this into consideration before they register).
        2. Advise students that they are asked to provide consent to the storage of their personal information (typically their name and email address, but the fields must be specified in the instructions) on the system.
        3. If they are concerned about having their personal information stored in the cloud, then they can use an alias.
        4. If an alias is used, they will need to inform the instructor of the alias.
        5. The instructor must keep a record of the student’s choice to use a generic ID or alias

    *NOTE that students are fine to use these tools with their own private information, but this must be voluntary – the above boiler-plate phrasing reflects the opt-in nature of students sharing their information in this way.

    Alternative Tools

    Many tools in use outside of UBC may not be FIPPA compliant, but there are other tools that function in similar ways. Provided below are FIPPA-compliant alternatives for popular tools.

    Non-UBC Tool UBC Alternative
    Dropbox MS Teams, OneDrive, Canvas Files
    Gmail, Hotmail FASMail (student, staff, and faculty email)
    Survey Monkey Qualtrics
    Google Docs Microsoft Word / Microsoft Excel, Canvas Pages
    Slack MS Teams, Mattermost (additional fee per year per teaching member)
    Skype Zoom
    Youtube Kaltura

    Interested in doing a PIA for a tool you would like to use for teaching?

    Contact us at lddi.educ@ubc.ca and we’ll connect with UBC Privacy Matters to evaluate the possibility of conducting a PIA.

    Useful Resources

    UBC Access and Privacy Guide

    Student Privacy and Consent Guidelines (Centre for Teaching and Learning with Technology – UBC)

    Privacy Fact Sheet: Providing Personal Information Outside Canada


    Questions, comments, or concerns? Send us an email!

    ETS Workshops

    Canvas Access Requests & Shell Creation

    ETS helps faculty in adding users to their courses (with certain limitations), as well as creating non-credit shells in Canvas. These requests can be submitted through email – please review the following information in order to familiarize yourself with the process and levels of access we support.

    Canvas Access Requests

    Canvas roles are managed through two separate systems – SIS and manual management.

    Here at ETS, we can only assist with adding manually managed roles (with the exception of granting temporary access while appointments are being processed – more information below).

    There is a total of 11 roles, each with different permissions. For a full breakdown of each role and what they are capable of, please refer to CTLT’s Canvas Roles and Permissions comparison chart. Highlighted below are the different roles we support and the permissions needed to grant access to each one.

    Non-Credit Shell Creation


    All credit shells (official course shells) in Canvas are automatically created by SIS once the course is confirmed, and students and instructors are automatically populated in the shell. This process can not be expedited by ETS – official shells must be created through SIS. However, ETS can create non-credit shells for faculty upon request. These shells are often used as instructor sandboxes (an open, private shell to experiment with Canvas), course development shells, cohort shells, communication shells, and more. If you are interested in having a non-credit shell created for any purpose in Canvas please contact ETS at ets.educ@ubc.ca. All access requests for non-credit shells are fully manually managed and don’t need any external permissions – users can be added with any role upon the request of the shell owner, as long as they have a CWL.

    Canvas Assignment Due Date Bulk Editor

    Canvas has a feature located within the Assignments tab, that allows instructors and course designers to modify the due dates and availability dates of multiple assignments.

    Instructor Benefit

    • Easily review and modify due dates when teaching a course again.

    Student Benefit

    • Help students plan for a successful term by ensuring accuracy of all due dates.

    Instructions

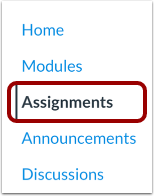
    Click on the Assignments tab

    1. Click on the Assignments tab

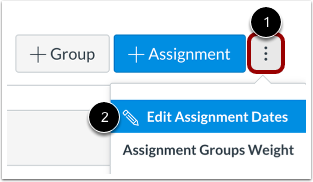
    Click on the menu bar button and click Edit Assignment Dates

    2. Click on the menu bar button and click Edit Assignment Dates

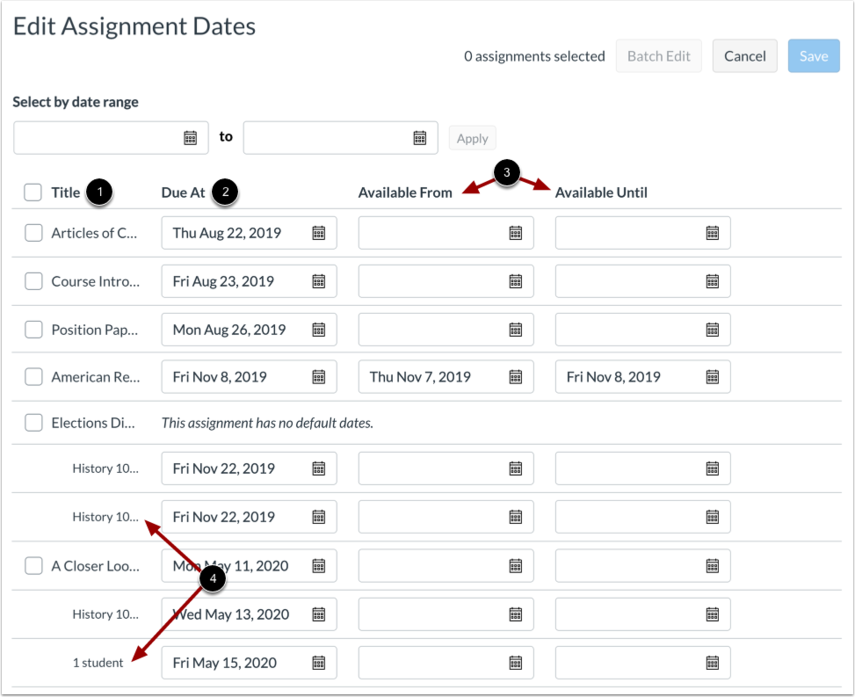
    Modify Assignment due dates by selecting a date range, selecting which assignments to edit and changing the dates.

    3. Modify Assignment due dates by selecting a date range, selecting which assignments to edit and changing the dates

    1. All graded items in your course, including assignments, discussions, and quizzes, are listed in the Title column
    2. Current assignment due dates (if any) display in the Due At column
    3. Current availability dates (if any) display in the Available From and Available Until columns
    4. You can also view and edit differentiated due dates for students, sections, and groups
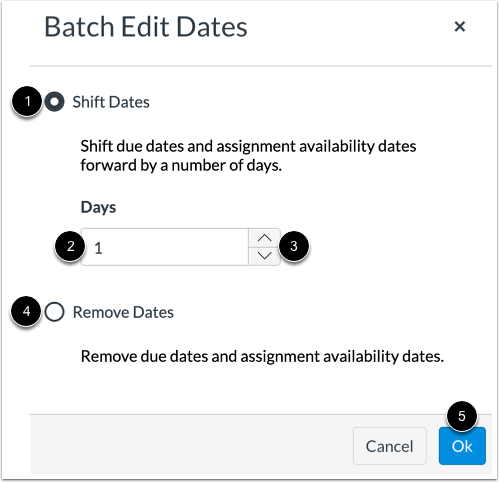
    Shift dates for multiple assignments by selecting multiple assignments and clicking the Batch Edit button

    4. Shift dates for multiple assignments by selecting multiple assignments and clicking the Batch Edit button

     
    1. To shift dates forward by a number of days, click the Shift Dates option
    2. Type the number of days to shift assignments dates in the Days field
    3. Or use the up and down arrow buttons to select the number of days
    4. To remove due and availability dates from all selected assignments, select the Remove Dates option
    To revert date changes for an assignment, click the Remove icon. Reverting changes removes any date changes made to the assignment dates.

    5. To revert date changes for an assignment, click the Remove icon. Reverting changes removes any date changes made to the assignment dates.

    Remember to click Save!

    6. Remember to click Save!


    Wiki Embed Test

    Assessment for Online Education

    Take a look at these examples of faculty of education online courses. They all have examples of assignments in support of online learning, any one of which you can borrow.
    Faculty of Education Online Course Designed for Online Education: Assessments
    ECED508: Review of Research in Early Childhood Education Interactive Learning Record, Written Assignments, Blog Posts, Self-Assessments
    EDCP538: Theory and Research in Environmental Education Multimodal Representation of Philosophy, Student-facilitated Seminars, Design Projects
    EDCP544: Mathematics and Science Teaching and Learning with Technologies Written Assignment with Peer Reviews, STEM Design Project, Discussion, Multimedia Learning Activity
    EDST515: Survey Research Design Written Assignments, Discussion
    EDST525: Program Evaluation in Adult and Community Education Written Assignments, Discussion
    EDUC440: Aboriginal Education in Canada Multimedia Stories, Quizzes, Discussion, Photovoice
    EPSE317: Development and Exceptionality in the Regular Classroom Visual Design and Analysis, Curriculum Mapping
    EPSE408: Educational Programming for Highly Able Learners Peer Collaboration, Curriculum Re-design, Peer and Self-Assessments
    ETEC510: Design of Technology-Supported Learning Environments Keyword Reflection and Peer Dialogues, Collaborative Curriculum Design, Multimedia Artefact, Digital Storytelling
    ETEC512: Applications of Learning Theories to Instruction Virtual Conference, Written Assignments, Concept Mappings, Self-Assessments
    ETEC565A: Understanding Learning Analytics Analysis of Learning Analytics Data Sets, Discussions, Written Assignments, Multimedia Artefacts
    LLED452: Disciplinary Literacies: Intermediate through Secondary Literacy Autobiography, Written Assignments, Discussion

    Three Levels of Online Course Design Complexity

    There is content from pre-existing online courses in the Faculty of Education that can be repurposed with very minor modifications, such as Assignments designed to take advantage of digital tools. 

    The Basic

    The Basic build will allow for many courses to be moved online and will provide a simple Canvas shell with supports provided to faculty members, including uploading content and an overview of how to use Canvas tools if needed. Many of the Faculty of Education courses being migrated to online-only in an accelerated timeline (COVID-related) will be provided a basic build in those cases where an online course version does not already exist. It is assumed that instruction of each course migrated online in a Basic build will include synchronous engagement (online face to face discussions/lecture) through Collaborate Ultra. Instructors would be using the pre-existing course materials, adapted to online presentation with the help of a PDCE/ETS support person.  The Basic build may or may not include all of the following elements that are in the prepared “course starter”:
    • Syllabus
    • Home Page (FoE banner and placeholders for Department and Instructor’s name)
    • Course Elements:
      • Announcements,
      • Syllabus,
      • Modules (structured for content),
      • Discussion forums
      • Assignments (repurposed from existing online courses, drop box for papers or quizzes),
      • Web Conferencing (Collaborate Ultra, Zoom)
      • Library Online Course Reserve (LOCR),
      • Grade (Gradebook),
      • People (Class list).
    • Navigation to the above course elements
    Examples for each element with instructions and descriptions are provided for guidance

    Level of support offered by PDCE/ETS Team

    • The Basic build will include 10 hours of Learning Design and 8 hours of PDCE/ETS support time.

    An example of a Basic build online course:


    The Advanced Basic

    In addition to the elements included in the Basic Simple, it is assumed that the instructor of the Basic Advanced build will create some unique course content such as content modules, designed specifically for online delivery. The course will be either a combination of synchronous and asynchronous components or completely asynchronous. It may include the use of additional Canvas tools or applications external to Canvas. Support will be customized for the preferred online delivery requirements of the Instructor.  The Basic Advanced build may or may not include all of the following elements that are in the prepared “course starter”:
    • Syllabus
    • Home Page (FoE banner and placeholders for Department and Instructor’s name)
    • Course Elements:
      • Announcements,
      • Syllabus,
      • Modules (structured for content),
      • Discussion forums
      • Assignments (repurposed from existing online courses, drop box for papers or quizzes),
      • Collaborate Ultra,
      • Library Online Course Reserve (LOCR),
      • Grade (Gradebook),
      • People (Class list).
    • Navigation to the above course elements
    Examples for each element with instructions and descriptions are provided for guidance

    Level of support offered by PDCE/ETS Team

    • The Basic Advanced build will receive 15 hours of Learning Design and 15 hours of PDCE/ETS support time.
    An example of a Basic Advanced build online course:

    The Comprehensive

     The Comprehensive build is an enhancement of the Basic Advanced build with the addition of extensive content modules authored by faculty and customized design by a PDCE/ETS learning designer in collaboration with a faculty member. Supports will be provided to faculty members to upload content and learn how to use Canvas tools.  Comprehensive Build will include: Co- creation of content with a faculty member to include web based multi-media components (for example: Visual, simulations, conducting a lab)
    • Enhanced Assessment strategies (for example: final exam with multiple types of questions for large group; project-based learning assessment; performative multimodal assessment; portfolio; peer assessment)
    • Enhanced engagement strategies (for example: team-based collaborative work; experiential learning; case studies; self-testing; interactive content)
    • Additional educational technology tools (for example: H5P; Collaborative Learning Annotation System (CLAS); Mattermost).

    Level of support offered by PDCE/ETS Team

    • The Comprehensive build will require 25 hours of Learning Design time and 15 hours of PDCE/ETS support time.
    Examples of Comprehensive build online courses are available on Examples of Online Courses page.