ETS helps faculty in adding users to their courses (with certain limitations), as well as creating non-credit shells in Canvas. These requests can be submitted through email – please review the following information in order to familiarize yourself with the process and levels of access we support.
Canvas Access Requests
Canvas roles are managed through two separate systems – SIS and manual management.
Here at ETS, we can only assist with adding manually managed roles (with the exception of granting temporary access while appointments are being processed – more information below).
There is a total of 11 roles, each with different permissions. For a full breakdown of each role and what they are capable of, please refer to CTLT’s Canvas Roles and Permissions comparison chart. Highlighted below are the different roles we support and the permissions needed to grant access to each one.
Non-Credit Shell Creation
All credit shells (official course shells) in Canvas are automatically created by SIS once the course is confirmed, and students and instructors are automatically populated in the shell. This process can not be expedited by ETS – official shells must be created through SIS. However, ETS can create non-credit shells for faculty upon request. These shells are often used as instructor sandboxes (an open, private shell to experiment with Canvas), course development shells, cohort shells, communication shells, and more. If you are interested in having a non-credit shell created for any purpose in Canvas please contact ETS at ets.educ@ubc.ca. All access requests for non-credit shells are fully manually managed and don’t need any external permissions – users can be added with any role upon the request of the shell owner, as long as they have a CWL.
Canvas has a feature located within the Assignments tab, that allows instructors and course designers to modify the due dates and availability dates of multiple assignments.
Instructor Benefit
Easily review and modify due dates when teaching a course again.
Student Benefit
Help students plan for a successful term by ensuring accuracy of all due dates.
Instructions
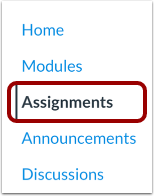
1. Click on the Assignments tab
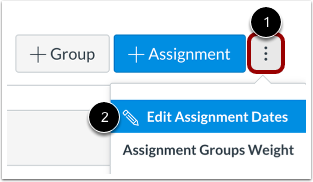
2. Click on the menu bar button and click Edit Assignment Dates
3. Modify Assignment due dates by selecting a date range, selecting which assignments to edit and changing the dates
All graded items in your course, including assignments, discussions, and quizzes, are listed in the Title column
Current assignment due dates (if any) display in the Due At column
Current availability dates (if any) display in the Available From and Available Until columns
You can also view and edit differentiated due dates for students, sections, and groups
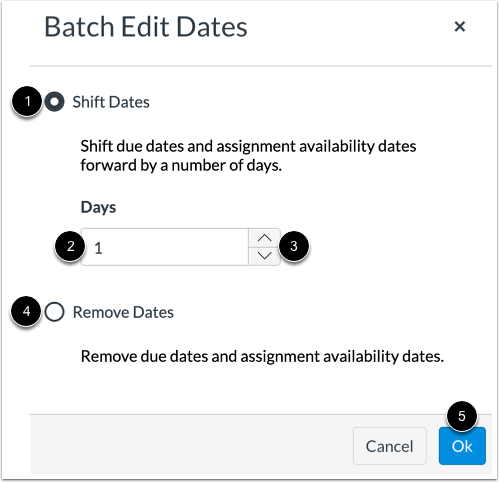
4. Shift dates for multiple assignments by selecting multiple assignments and clicking the Batch Edit button
To shift dates forward by a number of days, click the Shift Dates option
Type the number of days to shift assignments dates in the Days field
Or use the up and down arrow buttons to select the number of days
To remove due and availability dates from all selected assignments, select the Remove Dates option
5. To revert date changes for an assignment, click the Remove icon. Reverting changes removes any date changes made to the assignment dates.
Take a look at these examples of faculty of education online courses. They all have examples of assignments in support of online learning, any one of which you can borrow.
There is content from pre-existing online courses in the Faculty of Education that can be repurposed with very minor modifications, such as Assignments designed to take advantage of digital tools.
The Basic
The Basic build will allow for many courses to be moved online and will provide a simple Canvas shell with supports provided to faculty members, including uploading content and an overview of how to use Canvas tools if needed. Many of the Faculty of Education courses being migrated to online-only in an accelerated timeline (COVID-related) will be provided a basic build in those cases where an online course version does not already exist.It is assumed that instruction of each course migrated online in a Basic build will include synchronous engagement (online face to face discussions/lecture) through Collaborate Ultra. Instructors would be using the pre-existing course materials, adapted to online presentation with the help of a PDCE/ETS support person.The Basic build may or may not include all of the following elements that are in the prepared “course starter”:
Syllabus
Home Page (FoE banner and placeholders for Department and Instructor’s name)
Course Elements:
Announcements,
Syllabus,
Modules (structured for content),
Discussion forums
Assignments (repurposed from existing online courses, drop box for papers or quizzes),
Web Conferencing (Collaborate Ultra, Zoom)
Library Online Course Reserve (LOCR),
Grade (Gradebook),
People (Class list).
Navigation to the above course elements
Examples for each element with instructions and descriptions are provided for guidance
Level of support offered by PDCE/ETS Team
The Basic build will include 10 hours of Learning Design and 8 hours of PDCE/ETS support time.
In addition to the elements included in the Basic Simple, it is assumed that the instructor of the Basic Advanced build will create some unique course content such as content modules, designed specifically for online delivery. The course will be either a combination of synchronous and asynchronous components or completely asynchronous. It may include the use of additional Canvas tools or applications external to Canvas. Support will be customized for the preferred online delivery requirements of the Instructor.The Basic Advanced build may or may not include all of the following elements that are in the prepared “course starter”:
Syllabus
Home Page (FoE banner and placeholders for Department and Instructor’s name)
Course Elements:
Announcements,
Syllabus,
Modules (structured for content),
Discussion forums
Assignments (repurposed from existing online courses, drop box for papers or quizzes),
Collaborate Ultra,
Library Online Course Reserve (LOCR),
Grade (Gradebook),
People (Class list).
Navigation to the above course elements
Examples for each element with instructions and descriptions are provided for guidance
Level of support offered by PDCE/ETS Team
The Basic Advanced build will receive 15 hours of Learning Design and 15 hours of PDCE/ETS support time.
An example of a Basic Advanced build online course:
The Comprehensive build is an enhancement of the Basic Advanced build with the addition of extensive content modules authored by faculty and customized design by a PDCE/ETS learning designer in collaboration with a faculty member. Supports will be provided to faculty members to upload content and learn how to use Canvas tools.Comprehensive Build will include:Co- creation of content with a faculty member to include web based multi-media components (for example: Visual, simulations, conducting a lab)
Enhanced Assessment strategies (for example: final exam with multiple types of questions for large group; project-based learning assessment; performative multimodal assessment; portfolio; peer assessment)
A recent Canvas update has changed the Rich Content Editor (RCE) used in Discussions, Assignments and other tools The Kaltura media icon has moved. Below are the new steps for how to access Kaltura media files and embed them using the new RCE interface.
The Kaltura media button has migrated to a general “Apps” button at the far right hand side of the toolbar. On smaller screens or unexpanded windows, the plugin icon can be found by clicking the three vertical dots (more) icon.
Once you have clicked on the Plugin icon, you will be taken to a popup window with listed applications. Click on Embed Kaltura Media and you should be taken to your Kaltura library. -Note: if you click on the arrow or Media Gallery and Embed, nothing will happen.
From here, you can click “Embed” and the media should appear in your post as an embedded video frame.
This page provides you with access to a range of Faculty of Education online courses developed by faculty members in collaboration with PDCE/ETS Learning Designers and Learning Technology Support Staff. Explore these courses to see what is possible for your Online Course. Many of the assignments you will discover here can easily be migrated to your online course. For more examples of assignments, visit Assessment for Online Education.
NOTE: You will need to sign in using your CWL to access these courses. If you have trouble accessing any courses, please contact ETS.
Post an Announcement in text or video at the start of every week to both introduce the next week’s topic and to wrap up the previous week, making sure to highlight relevant course events and student discourse.
Participate in online discourse (e.g., discussions, group chat, etc.). Instructors do not need to respond to every student, as online courses should be more about student discourse. The instructor should contribute to push the conversation forward, or to bring the conversation back, if it deviates.
Hold online office hours as needed through a web conferencing platform such as Bb Collaborate Ultra or Zoom.
Provide timely feedback to your students on their assessments. You can use voice or video feedback options in Canvas. Students appreciate this as it feels like you are meeting with them individually.
To ensure students are progressing through the course and engaging on the same activities together you can:
Check results for the initial Learner Experience Survey provided. This can inform how to adapt the design of your course and your instructional strategies for the rest of the term.
If multiple students have similar questions about an assignment or activity, update the instructions for these items to ensure clarity for other students.
There are many strategies for learning activities and assessment in a face-to-face learning environment that may not provide the same opportunities for demonstration of learning in an online environment. Live online meetings may present barriers to students, and potentially lead to inequity in students’ learning experiences. For this reason, asynchronous alternatives to traditional synchronous strategies may provide the same demonstration of learning, but in a different form.When considering these alternatives, it’s important to consider the purpose of the activity or assessment you wish to provide, along with the form that student-created artefacts should take. The following approaches provide online alternatives for students to demonstrate their learning while also expanding opportunities for creative expression, engagement with wider professional communities of practice, all while learning additional skills beyond the creation of a written document or presentation file.It is important to consider that mandating a specific technology is not recommended. As all students have different preferences and confidence with technology tools, allowing students the option to create artefacts using tools they are familiar with, or wanting to explore is recommended. While some students may be more highly motivated to complete an assignment through the learning of new tools, consider including a disclaimer for students cautioning them on the time it takes to learn new tools vs. completing the assignment objectives. If you’d like to learn more, Open UBC’s Teaching in the Open resource can help.
Learning Outcome
Activity / Assessment Strategy
Traditional
Alternative
Explore a topic (birds eye view), and play with ideas and find areas of interest.
Students work together or individually to source ideas around a topic.
Face-to-Face Brainstorming Activity
Annotation of Web site, Document or Video
Concept Map / Mind map
Recall of information related to a particular topic area / theory (e.g., terms, theories, concepts, etc.)
Students complete a series of questions that demonstrate either recall of learned information or essay responses to case study scenarios
Exam / Pop Quiz
Flash cards
Study Guide
Tutorial video
Understand a particular topic area / theory
Summarize / synthesize a list of readings and critically analyze arguments.
Literature Review, Essay, Annotated Bibliography.
Website / Blog
Video tutorial
Interactive Timeline
Understand a particular topic area / theory
Read a case study and work as an individual or group to present analysis of case study based on literature.
Written Case Study Analysis
Website / Blog
Visualization
eBook
Virtual Tour
Video presentation
Demonstrate leadership/expertise in a particular topic area / theory
Students work together to create materials that demonstrate their understanding of a topic and / or contribute to new knowledge in the subject area.
Written Group Project or face-to-face Presentation
Reflect on one’s own learning process over time using metacognitive approaches, while also demonstrating leadership/expertise in a topic area
Students gather assessment submissions across the duration of their program and write reflections on each, demonstrating an understanding of their own learning progression.
Portfolio
Website / Blog
Visualization
eBook
Virtual Tour
Video presentation
Understand research methodologies and conduct research.
Students identify a topic of interest and engage in a small informal research project, including the gathering of data, analysis and writing of results and discussion of implications.
Written Research Project
Video documentary
Website / Blog
eBook
Virtual tour
Journal Article
Learning Technologies that Support these Activities
Etherpad is a simple to use, “multiplayer” text editor which supports synchronous document editing and collaboration. It is an open-source project, and when hosted in Canada complies with FIPPA. This is a unique quality not found in other collaborative document editors (like Google Docs), making Etherpad a solid option for teaching and learning.
Etherpad is FIPPA compliant and data is stored securely in Canada
What Can It Do?
Etherpad’s most notable feature is synchronous document editing, which allows multiple users to work on a document at the same time. The tools available within the app are very similar to what you will find in any text editor – text styling, list formatting, headings, font styles and sizing, etc. The layout of these tools also emulate that of commonly used text editors, making the learning curve minimal. Etherpad also allows users to leave comments on a document and mark them as suggested changes to support collaboration without infringement on an individual’s work. Sharing a document is as easy as sending an email invite or copying a shareable link, and new document collaborators automatically join anonymously and can choose a pseudonym to work under if privacy is a concern. Synchronous communication is made even more accessible through the chat feature, which facilitates real-time, casual discussion outside of the working document.Asynchronous participation is also supported as users can access shared documents at any time, regardless as to whether the host is currently editing. This is good to keep in mind for participants in different time zones, who have busy schedules, or whose home internet is less stable.
Getting Started
The easiest way to get started with Etherpad is through OpenETC’s BC-hosted Sandstorm server that provides students and educators with access to 70+ open-source web applications. Click here to get started by creating an account with your institutional email address: https://apps.opened.ca. Once you have access to Sandstorm, you will be able to browse and search for web apps in their app market. Look for Etherpad and click Install, which will add the app to your Sandstorm dashboard. Click “create new pad” to begin working on your first Etherpad document!
How does it work?
Rename your pad by clicking on “Untitled Etherpad pad” on the top left.
Invite a friend or colleague to join your pad by clicking the “Share Access” button at the top. Send an invite via email or by copying the shareable link – use the drop down menu to change the permission settings before sharing the invitation.
Play around with the different text editing tools while you work simultaneously with your guest – notice how the text is color coded to flag who is writing what.
Try changing your display name by clicking on the people icon on the top right.
Highlight the section of text you would like to comment on.
Click the chat bubble icon to the left of the text alignment tools.
Type your comment into the pop up box that appears. Check the “include suggested change” to toggle another box which will allow you to leave your suggested edit.
Click the comment button to save your comment and make it visible to all users. Reopen the comment and click “accept change” to have your suggested edit replace the existing text.
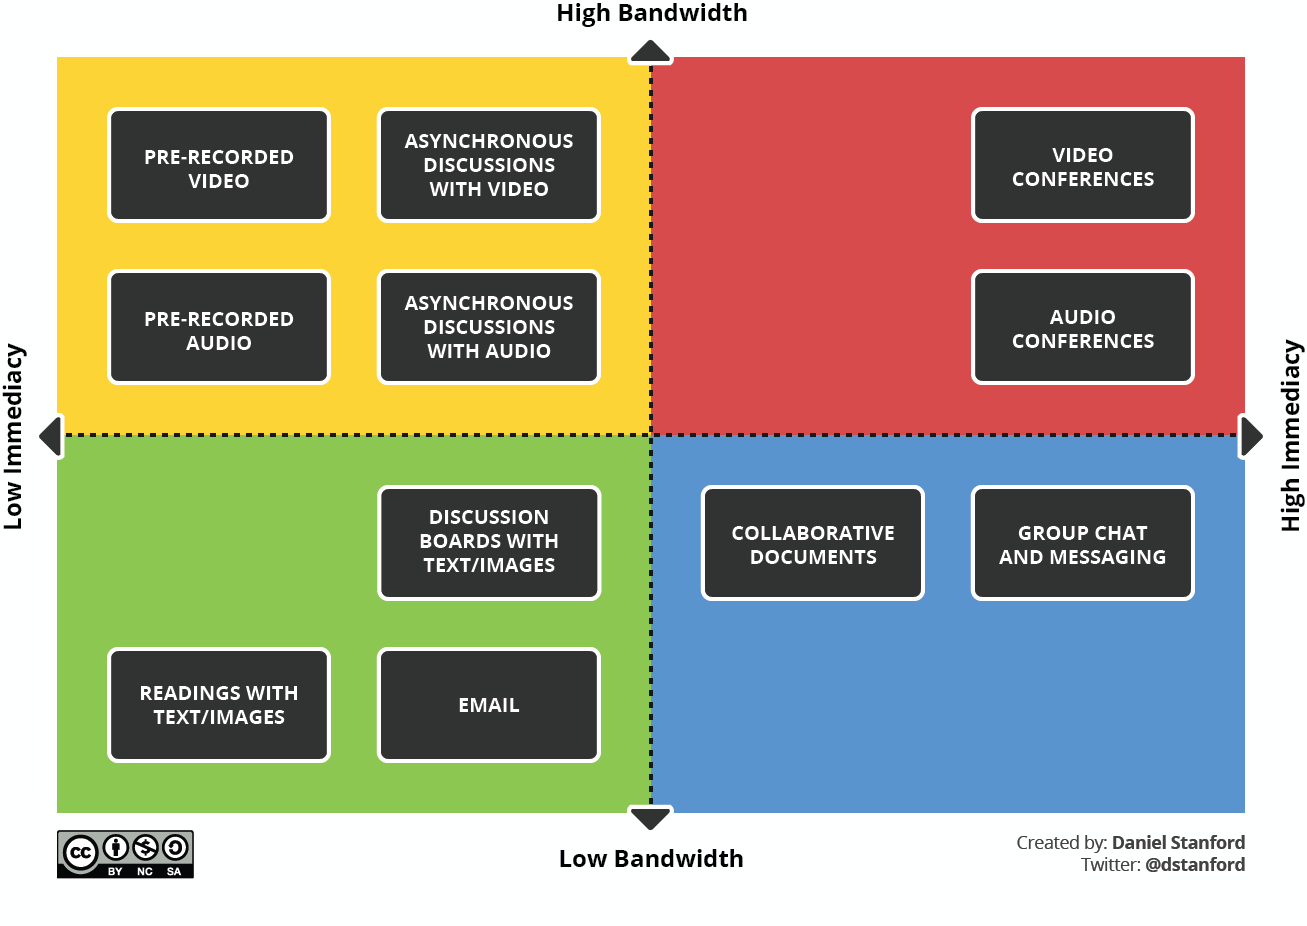
Using Etherpad in Teaching and Learning
One of the bigger challenges instructors are facing with the shift to remote teaching is finding ways to facilitate group assignments. This often requires high immediacy tools to remediate the collaboration possible when teaching and learning face-to-face, which is often resolved using videoconferencing tools like Zoom or Collaborate. However, this approach can be problematic, as explained by Daniel Stanford in his article “Video Conferencing Alternatives: How Low-Bandwidth Teaching Will Save Us All”, where he writes “videoconferencing is one of the most inflexible and bandwidth-intensive activities we can ask our students to do.” In his Bandwidth Immediacy Matrix, there is an obvious gap in the “blue zone”, the area for tools with high immediacy, but low bandwidth. Etherpad helps fill in this gap, providing educators and students with a platform that allows for instantaneous collaboration, without needing a lot of bandwidth or all the tech gear necessary for video conferencing.